7 Season Extenders to Enjoy a Longer Harvest
Fall is officially here! It’s a beautiful season of cool, crisp days, and stunning colors. Temperatures will continue to go down, frost will come, and your garden will be done until spring.
n
Tags:
Fall is officially here! It’s a beautiful season of cool, crisp days, and stunning colors. Temperatures will continue to go down, frost will come, and your garden will be done until spring.
But it doesn’t have to be! It’s not too late to devise a way to extend your harvest season for a few weeks, a few months, or straight through the winter.
Warm weather plants, such as tomatoes, peppers, eggplant, squash, and basil must have protection from cooler temperatures and frost. Growth is slowed when temps are in the 40s, so they should be covered as soon as nights begin to cool off. They may not produce much more, but fruits will be able to ripen before being zapped by frost. These plants will not make it through a frost, unless they are covered by season extenders.
Cool weather plants, such as lettuce, broccoli, root crops, and greens, prefer the lower temperatures of fall. Kale actually sweetens with a light frost. These crops should be covered when a hard frost threatens. I have harvested covered lettuce well into November!
Season extending covers can be simple and cheap or elaborate and expensive. They are easy to make or commercially available. There are many options, so there’s no reason not to have something in place to get the most out of your organic garden investment now and again in spring.
Floating row covers are made of a spun polyester that allows rain and air to penetrate, while keeping heat in. Again, drape the fabric over your plants, and secure the edges. Don’t be afraid to use two or three layers as extra protection when it gets really cold.
If you have only a few plants to protect, consider covering them with cloches. Cloche in French means ‘bell jar’. Individual glass jars were put over plants in 19th century French gardens. Glass cloches are still available. They are decorative as well as functional, but are also high maintenance. Each one needs to be closed up at night and opened in the morning, as with any type of cover. This makes them useful for a few plants, but not a large organic garden.
Make Your Own Cloche: You can easily devise your own cloche out of a glass or plastic jug, by cutting off the bottom and removing the lid. The modern, manufactured version of the cloche is called a Hotkap. These are designed for one season’s use. I am not a fan of disposable items, but these do solve the problem of storing a lot of jar-size cloches.
A hoop house is a permanent greenhouse with headspace for people and equipment. The soil absorbs the sun’s heat during the day and radiates it back out at night. Row covers can be placed over crops during very cold weather. Building a hoop house is an easy DIY project.
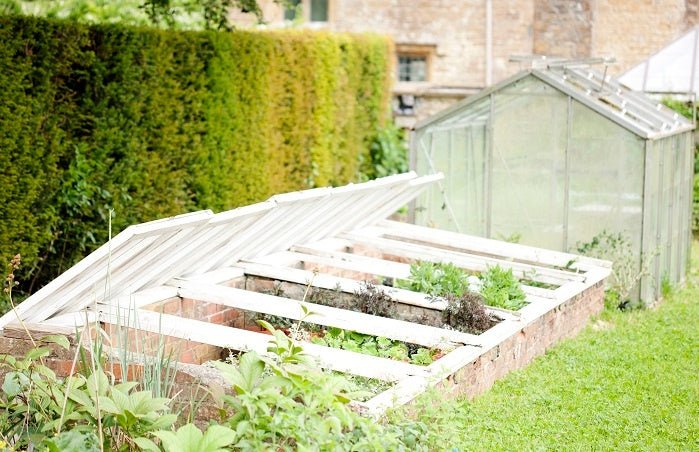
Building a cold frame is another good DIY project. This can be as simple as a wooden box with an old window hinged to the top. That was my first cold frame. I added a hydraulic solar vent opener that automatically opened the top when it reached a certain temperature. This kept the cold frame from overheating and killing the plants.
Make Your Own Cold Frame:
1. Old Sheets
When frost threatens, simply throw some old sheets on your crops. Secure the bottom with rocks or other weights. You can even shovel dirt onto the edges. Sheets – simple and cheap. Scour yard sales and thrift stores for them.2. Floating Row Covers
3. Frost Cover
Frost cover is a heavier row cover specifically for colder weather. Temperatures under a frost cover can be up to 10º higher than the outside temp. That gives you quite a bit of leeway with cool weather crops. If it’s 25º outside, your plants will be a cozy 35º. Place black-painted gallon milk jugs among the plants. They will soak up heat during the day, and keep the raise the temperature inside.4. Cloches
5. Low Tunnels (Mini-Hoop Houses)
Low tunnels are mini-hoop house greenhouses. Put some hoops under your row cover, and you have a low tunnel that is just tall enough to cover the plants. Several layers of row cover or greenhouse plastic can be used for extra insulation. A frame on the bottom for anchoring the hoops makes the whole structure portable. Eliot Coleman grows year round in low tunnels in frigid, snowy Maine!6. Hoop House (Greenhouse)
7. Cold Frame
- Use strawbales, which have natural insulating properties. Make a square or rectangle of them, and top with used windows.
- Hinge two windows together on the long side, and prop the structure over your plants in an inverted V. You could even do this on top of the strawbale cold frame for taller plants.
Would you like to be the first to hear about our new products and more? Sign up for our Nature’s Path Newsletter.


